Indicator Crystal Installation

The crystals (clear plastic lens) for test indicators, dial indicators and calipers are typically larger than the bezel for which they are designed.

New crystals are also flat. They become domed once they are inserted, under pressure. An old crystal will appear domed because, after a long time, it will take on this shape. Unfortunately, at this point it will also fall out easily.

The crystals have a beveled edge which will fit into the groove on the upper part of the bezel, but must be inserted in a concave (domed) manner so that the crystal will remain in place under pressure, and so that the plastic clears the movable dial hand. You will need to order a crystal that is at least 1 mm larger in diameter than the bezel requires.

Image
Image

The flat crystal Ø has to be larger than the inside diameter (i.d.) of the bezel (where the crystal will fit).

A crystal press is usually required to give the plastic lens its concave shape. (Bestest indicators and B&S calipers are exceptions.) Place the crystal and bezel in the press, in the correct orientation (take into consideration the beveled edge: the smaller surface will become the upper surface) and while the press is bending the plastic, gently snap the bezel into place. Release the press and the crystal will be firmly seated and have the correct curvature.

The press cannot be used with crystals made of glass, which will shatter under pressure.

Glue or cement is never used to hold the crystal in place. Some manufacturers may use a thin bead of silicon to create a waterproof seal. This is a tricky maneuver and should only be attempted with caution.

Hint: Use a bottom cup the same size or one size smaller than the diameter of the crystal.

Why didn't we think of this before?

Wouldn't it be easier to just buy a new bezel with a crystal already installed? If you don't have a crystal press, it's the way to go.

Although we've never tried it, some people have success polishing cloudy or scratched crystals with Duragloss 681.

Crystal Size Chart

Even though the manufacturer's name may be listed next to a particular crystal in the ordering chart below, it does not mean that every indicator or caliper made by that manufacturer can use that crystal. Be sure to measure the inside diameter of the bezel. (Read instructions above carefully)
Note: this is the maximum diameter (±0.1 mm) of the plastic crystal when flat. After the crystal is installed, it will be domed. If you measure an old crystal, which is already domed, take this into consideration.

Order No. Diameter Suitable for (read instructions below carefully)
W 19-1/2 25.1 mm Alina, Compac (small dial models) $8.50
W 22-1/2 26.7 mm Standard Gage, Mitutoyo $8.50
W 24 27.9 mm BesTest (old models), Girod, Puppitast, TesaTast $8.50
W 25 28.6 mm MarTest, China, Interapid, Federal "A", B&S Group O $7.50
W 28 30.8 mm Mitutoyo "Pocket" style, Starrett models made in China $7.50
W 34-1/2 34.7 mm Mitutoyo, Teclock $7.50
35.7 mm Brown & Sharpe, TESA, Etalon, Compac (special .032" thickness)
W 37-1/2 36.6 mm Starrett model 196, Interapid $7.50
W 38 36.8 mm Starrett $7.50
W 39-1/2 37.8 mm Girodtast, Tesatast, Mitutoyo, B&S, Starrett $7.50
W 40-1/2 39.0 mm Alina, Puppitast, MarTest, Compac, Boice $7.50
W 43 40.0 mm Starrett $12.50
W 46 42.0 mm Mitutoyo $12.50
52.1 mm Peacock, Intertest
52.1 mm Compac dial bore gage (old style)
53.2 mm Boice, Starrett, Mahr-Federal
53.8 mm CDI, Mitutoyo, S-T, Standard, Starrett, Teclock

10 Piece Jeweler's Screw Driver Set
An indispensable tool when making indicator repairs and adjustments

How to replace a Test Indicator crystal.

HOW TO REPLACE A TEST INDICATOR CRYSTAL

We list the indicators here by their manufacturers' names. Many indicators are sold with vanity names, so you may have to find out who the real manufacturer is. Order the appropriate sizes from the list above.

Alina test indicator: loosen, but don't remove, the three tiny screws under the bezel which can now be pried off, with your hands, like the lid of a take-away coffee cup. You may have to twist and turn the bezel a bit until it works. They can occasionally be stubborn. You'll need a press to insert the 25.1 mm diameter crystal (small) or the 39.0 mm diameter crystal (large).

BesTest test indicator (current models): the old crystals are removed with a simple tool that acts like a suction cup. You can improvise other methods but you're likely to cause damage. If the bezel is still round and in very good condition, you can probably just press the new crystal in place using your thumbs. If the bezel is dented or bent out of shape, then it's best to leave this to someone with the right tools. See online parts list.

Bestest test indicator (old models): the bezel can be pried off with a flat bladed screw driver. A metal spacing ring is removed from behind and the old crystal is pushed out with your thumb. Careful you don't cut yourself on the metal bezel. The new crystal is pushed in from below, again with your thumb. It is slightly over sized so that it will become convex in the process. The metal retainer is also put back in and the bezel is pressed back in place on the indicator. Use 37.8 mm diameter crystal (for the large bezel) and #240 (for the small 28mm bezel). The much smaller 25 mm bezel, rarely seen, uses a crystal which we no longer carry.

  • Brown & Sharpe 7030-2 uses crystal #240 (press not required)
  • Brown & Sharpe 7038-2 uses 37.8 mm diameter crystal (press not required)

Brown & Sharpe / Bestest briefly had its name on what is an Interapid Swiss-made indicator. See instructions for Interapid.

  • Brown & Sharpe 7028-4 uses the 36.6 mm diameter crystal

Compac test indicator: remove the spring which is visible in the groove on the underside of the bezel. Use a thin needle to get the spring out. Try not to bend this spring out of shape. The bezel, if undamaged, lifts off easily. There is no need to remove anything else. You'll need to use a crystal press to get the new crystal into the bezel. Original Swiss crystals are brittle. If you apply too much pressure with the press, they'll shatter. When assembling make sure the tab on the outer dial fits into the space allotted for it on the inside of the bezel. If the bezel now turns too easily or too hard you can make adjustments by reshaping the spring.

  • Small bezels approx. 27 mm in diameter: 25.1 mm diameter crystal
  • Large bezels approx. 40 mm in diameter (models with the letter G): 39.0 mm diameter crystal

Important note: do not attempt to remove the bezels on the Compac 240 series test indicator (which has one revolution). Doing so, will result in the loss of hair spring tension. Unless you know what you are doing, send these to a repair shop for servicing.

Federal Testmaster test indicator: The old style Testmaster indicator has a bezel which can be tricky to remove. A slot on the side of the bezel will allow you to depress the spring which holds the bezel in place. Rotate the bezel until the spring is visible and then use a thin bladed screw driver to press the spring. If you can't get this to work and resort to prying the bezel off, you will inflict some damage on the top plate. The small bezel (about 1" diameter) takes crystal #210 which must be inserted with a press.

Fowler-Verdict test indicator old style indicators made in England use 37.8 mm diameter crystal on the approx. 1.5" diameter bezel which need to be inserted with a press. The bezel can be pried off with a screw driver. The smaller one-inch diameter bezels are also pried off and Starrett Last Word indicator crystals (PT07112) can be pressed in place, although not always easily. It may not be necessary to remove the bezel since the new crystal could be pressed in place from above.

Gem test indicator test indicator: very much like the Starrett Last Word, the bezel is pried off with a screw driver. You can discard the wire ring and install the Starrett Last Word crystal. These crystals are molded to shape so you won't be able to use any of the flat crystals listed on this page.

Girod test indicator: the thin-walled bezel can be carefully pried off with a screwdriver. The new 37.8 mm diameter crystal (for the large bezel) and #240 (for 28mm bezel) can be pressed into the bezel from below using your thumbs. Don't forget to put the spacing ring back before pressing the bezel onto the body.

Interapid test indicator: the bezel is threaded and unscrews. Hold the lower bezel plate steady with a small screw driver placed in one of the two holes while you unscrew the bezel. See online parts list.

  • Interapid 312B-3 uses the 36.6 mm diameter crystal (crystal press required)
  • Interapid 312B-2V uses the 28.6 mm diameter crystal (crystal press required)

Kafer test indicator: once you (carefully) pry off the retaining ring on top, the crystal just drops out. Replace it and you're set to go. Kafer crystals are offered elsewhere on this web site.

  • 37.3 mm Kafer 5.2109 (plastic without beveled edge, lies flat)
  • 53.8 mm Kafer 5.2101 (plastic 1.1 mm thick without beveled edge)

Mahr test indicator: Puppitast has a thin-walled bezel which can be pried off with a screwdriver, but do this carefully. The new 27.9 mm diameter crystal (for the small faced models) can be pressed into the bezel from below. No special equipment is needed. Remember to put the spacing ring back into place before pressing the bezel back onto the indicator. The larger diameter bezels (about 1-5/8 inch) behave the same way and require the 39.0 mm diameter crystal.

Puppitast 800 SM test indicator uses the 39.0 mm diameter crystal The oldest model Puppitast lift off the same way but they do not have a spacing ring and you will need a crystal press to insert the 39.0 mm diameter crystal into the 40 mm diameter bezels.

Mahr-Federal test indicator new style indicators "MarTest" have bezels which ride on a rubber o-ring. They can be pried off but you'll need a press to insert the 39.0 mm diameter crystal into the 1.5" diameter bezel. The smaller 30 mm bezel will take the 28.6 mm diameter crystal.

How to replace a Dial Caliper crystal.

HOW TO REPLACE A DIAL CALIPER CRYSTAL

B&S dial calipers (Tesa and Etalon current models): the old crystals are removed with a simple tool that acts like a suction cup. You can improvise other methods but you're likely to cause damage. If the bezel is still round and in very good condition, you can probably just press the new crystal in place using your thumbs. If the bezel is dented or bent out of shape, then it's best to leave this to someone with the right tools. See online parts list.

  • Old model 579-1 calipers have a bezel that pries off. You can easily insert the 37.8 mm diameter crystal into the bezel from below. Don't forget the spacing ring before you press the bezel back onto the calipers.
  • Very old model 578 calipers made in Germany use a 30 mm diameter crystal which we do not carry.

Etalon dial calipers (old models made by Pierre Roch) these calipers from the 1950's are so good that we still run into people who use them. They can be identified by the words "Pierre Roch" on the far end of the beam. Near the front, the word ETALON is printed conspicuously, but there is no identifying model number on the dial face or elsewhere. Loosen the bezel lock and pry off the bezel with a flat screw driver. Rotate the bezel as you pry so that it lifts off evenly. The old crystal can be pressed out with the thumbs (take care not to cut yourself). Similarly, the 37.8 mm diameter crystal can be pressed back in place. Since the crystal has a beveled edge, make sure you insert it in the correct orientation. Don't forget the white spacing ring and press the bezel back in place. Could not be easier. And now, your old Etalon calipers are good for another 50 years.

Kanon dial calipers: we do not have the original pre-domed crystals for the 6" calipers. Some Kanon calipers have bezels which can be pried off and the crystal is pushed in place from below. A metal spacing ring will keep the crystal from touching the dial hand. If this is the case, and the OD of the bezel is 38 mm then you can install 37.8 mm diameter crystals. The crystal is pressed in place using your thumb. It will then become domed. Note that this may not work with all Kanon calipers.

Mitutoyo dial calipers: 37.8 mm diameter crystal is flat, slightly over-sized and becomes domed when you press it in place. The 34.7 mm diameter crystal is flat, slightly over-sized and also becomes domed when you press it in place. For 12" model 505-628-50 use crystal #460. Measure the diameter of the bezel to determine which crystal to use, or include the Mitutoyo model number when ordering. You will also find crystal and bezel assemblies at our online parts list. Buying the assembly eliminates the need for a crystal press.

Mitutoyo dial calipers old model dial calipers You can use the 34.7 mm diameter crystal for the oldest model Mitutoyo dial calipers, the ones that do not have any model numbers printed on the dial face and the outside diameter of the bezel is 36.1 mm. You will have to insert the crystal with a press because it will be slightly oversized. Pry the bezel off carefully because it is thin walled and remember to remove the bezel clamp first. If you leave the bezel clamp on, you will most likely break it. These clamps are no longer available.

SPI dial calipers and other made in China calipers. If the bezel pries off and there's a plastic spacing ring underneath the old crystal, and the inner diameter of the bezel, measured from below, is 42.5 mm then proceed as follows: remove the spacing ring and press out the old crystal by hand. Be aware that you may cut your thumbs doing this. You can then install crystal #480 (43.2 mm) by pressing it into place, from below, so that it becomes slightly convex. Replace the spacing ring and press the bezel back onto the calipers. If your caliper does not fit this description, we can't help you.

Starrett dial calipers model 120-6 and 120A-6 calipers: since you'll need a press to insert the crystal, you may be better off ordering the bezel and crystal assembly instead. This way there's "no assembly required." The new bezels are held in place with an o-ring so you'll have to pry off the bezel, slowly, with something like a large blade screwdriver. Order crystal 36.8 mm or see online parts list. Model 1202 calipers (made in China) technically do not have replacement crystals available from Starrett, but you can use the 37.8 mm diameter crystal. Pry off the bezel with a large blade screwdriver (after removing the bezel lock screw). The old crystal comes out easily, but you will have to force the new crystal in place, with your thumb, so that it becomes domed. Don't forget the white spacer when you press the bezel back onto the calipers.

Tesa dial calipers dial calipers are very similar, if not identical to the Brown & Sharpe dial calipers (see above). For the oldest, without identifying model numbers "Swiss Made Shockproof" you will need to pry off the bezel with a flat blade screwdriver. Crystal (37.8 mm diameter) presses into place quite easily from below, just using your thumbs. Don't forget the faceted spacing ring before you press the bezel back in place.

How to replace a Dial Indicator crystal

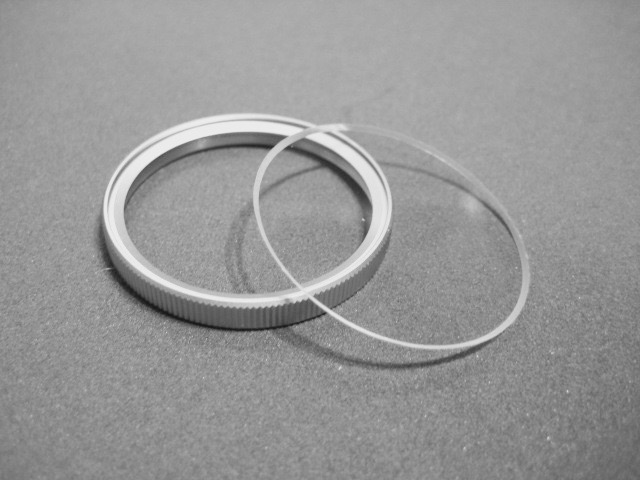
HOW TO REPLACE A DIAL INDICATOR CRYSTAL

Aerospace dial indicator: these cheap made-in-China indicators aren't worth fixing, but you can replace the crystal, if you can get hold of one. The thin bezel pries off with a screw driver (put the whole indicator in a vise so you can get leverage) and no tools are required to put a new flat crystal in place. We do not carry these crystals.

Ames dial indicator: a split retaining ring holds the old-style bezel in place. Carefully pry it out and the bezel will lift off. The new crystal is pressed in place from below with considerable force and it's not unlikely that the crystal will be damaged in the process. Use extreme caution. For Series 200 models order the 53.8 mm diameter crystal.

  • Back plunger model 22A uses the 40.0 mm diameter crystal which is inserted with a press.

Boice dial indicator (discontinued) bezels are held on with a wire spring. You can pry the bezel off with a large blade screw driver. You'll need a crystal press to insert crystal diameter 53.2 mm on the large bezels and the 39.0 mm diameter crystal on the small bezels.

Brencor dial indicator uses inexpensive Chinese indicators on their chamfer gages. Remove the back cover and you will see a small tab held in place with a screw. Do not remove the screw but loosen it enough to slide the tab inwards, thus releasing the bezel. There is a spring on the opposite side. Be careful you don't lose this. The 54.6 mm diameter crystal needs to be inserted with a press. Reverse the procedure to reassemble.

Brown & Sharpe dial indicator (made in Switzerland): most of these new models have unit bezels and the crystal has to be pried out. Use your ingenuity but be careful not to damage the dial or bend the hand. We don't yet know how best to insert a new crystal nor what the proper sizes are. They snap in place like the Bestest indicators and one assumes that a similar inserting mechanism is used by the manufacturer. Since these gages are inexpensive, in the realm of things, they're considered "throw-aways" by the manufacturer and were not designed for easy servicing.The Group O dial indicators (MW 71 for example) use crystal the 28.6 mm diameter crystal and will require a press for insertion.

Brown & Sharpe dial indicator (made in USA): for the Group 2 indicators which had fiberglass bodies, such as model 599-8241-942, the bezel is held in place with 3 very evident screws. The 54.6 mm diameter crystal needs to be inserted with a press.

CDI dial indicator: the 2-1/4" diameter bezel can be pried off—it rides on a plastic o-ring. The 53.8 mm diameter crystal is inserted with a crystal press. Getting the bezel back on can be a task. It's a tight fit over the o-ring. Make sure the small tab on the inside of the bezel fits into the slot on the dial. Group 3 indicators with 2-3/4" diameter bezels have 3 screws in the side of the bezel which need to be taken out. Don't lose these! You can insert a 66.0 mm diameter crystal with a press.

China dial indicator: The approx. 2-1/4" bezels take he 54.6 mm diameter crystal. Remove the back cover and you'll notice a screw which holds a small sliding tab in position. Loosen this screw just enough to slide the tab back. The bezel will now lift off by pivoting it. Be careful not to lose the small wire spring which is also used to hold the bezel. The crystals we provide are flat and require a crystal press for insertion.

Compac dial indicator Among the several different bezel styles, the large 82 mm diameter bezel unscrews and a new crystal (#1065) is pressed in place. Inserting these large crystals can be problematic. A press is mandatory. For the IAP365A dial bore gage, use 355-032 which is extra thin. A press is also required.

Dorsey dial indicator: AGD 2 indicators have two springs holding the bezel in place. Remove the back cover and pull the springs back. The bezel will lift off, one side at a time. Be careful you don't lose the springs. The 54.6 mm diameter crystal needs to be inserted with a press. AGD 4 indicators use crystal #47084 which, being oversized, needs a press for insertion and the edge of the crystal may benefit from a little bit of scraping to reduce the diameter. If the crystal lies flat (without a dome) however, it will touch the pointer (which is very delicate). Proceed with utmost caution. 3 hex screws hold the bezel in place.

Federal dial indicator: three small screws in the side of the bezel hold it in place. Don't lose the screws because they are mighty expensive to replace. The newest Federal models have an o-ring. You simply pry the bezel off with the blade of a screw driver. The small Size A bezels have a small slot and you are supposed to be able to depress the bezel spring which you are supposed to see through the slot. Use a very small screwdriver and watch your fingers (danger alert). Large diameter crystals (D,E) may not work with standard crystal presses.

  • Federal A1/2Q uses the 28.6 mm diameter crystal (crystal press required)
  • Federal B2I uses the 40.0 mm diameter crystal (crystal press required)
  • Federal B3Q uses the 40.0 mm diameter crystal (crystal press required)
  • Federal "D" indicators use the 65.8 mm diameter crystal (special fixture required for insertion)

John Bull dial indicator: these old AGD 2 models have 4 screws clearly visible on the underside of the bezel rim. When removed, the bezel lifts off easily. Install crystal 55.5 mm with a press. Line up the tab on the outer dial ring with the slot in the bezel when assembling.

Kafer dial indicator: the two tolerance marker rings have to be pried out on the AGD 2 dial indicators. Be careful, if the bezel is plastic you will probably damage it. The crystal can easily be removed and replaced without any tools. For plastic crystal order Kafer #5.2101 and glass crystal order Kafer #5.2102.

Mahr-Federal dial indicator: The newest style indicator has a plastic bezel which pries off like the lid on a coffee cup. You can use a large flat-bladed screw driver to help. You'll notice there's no o-ring but a raised ridge inside the bezel which snaps into the groove on the indicator's body. There may be tolerance markers which can easily be removed if you grab the tabs with jeweler's pliers and pull inwards, towards the center of the bezel. The old crystal snaps out with a bit of force. The new crystal diameter 53.2 mm is inserted with a press, again using considerable force because of the deep recess of the groove. You may be better off just buying a new bezel and crystal assembly in this case. Parts are not available from us.

Mitutoyo dial indicator: the newest models have the letter "S" attached such as 2416S. These have a single unit plastic bezel and crystal which snap on over a rubber o-ring. The crystal may pop out leading you to believe that it's replaceable. It isn't; but, if you're very careful, you can attempt to glue it back in place although we don't recommend this. See Mitutoyo parts lists for ordering numbers.

Mitutoyo dial indicator: (old models) Getting the bezel off is one of the tricks you need to master. Remove the indicator back and you will see a bent piece of spring wire at one edge. This wire rides in the bezel's groove. You will need to depress this wire to disengage it. At that time, the bezel will lift up revealing another, smaller, similar wire on the other side. These have a habit of getting lost in the process, so be careful. The oldest models had a flat crystal which needs to be inserted with a press so that it becomes domed.

  • AGD 1 indicators (with a bezel diameter of about 1-3/4 inches) use 37.8 mm diameter crystal
  • AGD 2 indicators (they have a bezel diameter of about 2-1/4 inches) use the 53.8 mm diameter crystal.
  • AGD 3 indicators, use 72.4 mm crystals but these are not available from us. The Mitutoyo crystal press shown at the top of this page will not be suitable for AGD 3 indicators. The crystal diameters are too large for this press. We suggest having these professionally installed.
  • AGD 4 indicators such as 4802-10 will use crystal 110443 but these are impossible to install without equipment. Crystal 110443 is a Mitutoyo part and is not available on this page. You should have a repair shop install these for you.

Peacock dial indicator: we don't know enough about every Peacock model, but #1364 indicator with a 2-1/4" OD bezel will take a crystal with 52.1 mm diameter. This is not the original manufacturer's crystal, but it'll do in a pinch. It's flat and needs a press for insertion. After insertion it will be slightly domed. Remove the 3 small screws on the side of the bezel (don't lose them - we don't have these parts) and carefully lift the bezel off it's o-ring. The inner dial is more or less permanently staked to the bezel. It will lift off also and could damage the large hand if you don't watch out.

Scherr-Tumico dial indicator (S-T): Some of the bezels have a large hole on the side. You'll find 3 screw heads by rotating the hole. Unscrew all of these and don't lose them! (We don't have these parts.) The 53.8 mm diameter crystal can be inserted with a crystal press.

SPI dial indicator: most SPI dial indicators are made in China. See instructions under "China" above.

Standard Gage dial indicator (Poughkeepsie models only): The newer, but discontinued style AGD2 indicators with ~2-1/4" bezel diameters and two small screws holding the inner dial in place will take the 53.8 mm diameter crystal. These bezels are held in place with a nylon o-ring. Use a large bladed screwdriver to pry the bezel off. A crystal press is needed to insert the crystal. It may be hard to get the bezel to snap back onto the o-ring. Press down firmly and squarely with the palm of your hand.

  • The long obsolete D7-20045-B dial indicator for the small Standard bore gage uses crystal #220. This is a Federal indicator and instructions for Federal test indicators apply. You will need a crystal press.

Starrett dial indicator: the old style size 2 dial indicators have a small hole on the side of the bezel. You're supposed to be able to depress the bezel spring, which holds the bezel on, through this hole using a small pin. Crystals will need to be inserted with a crystal press. Good luck to you. If you get it just right it'll work.

  • The new style AGD 2 size bezel series 25 snaps on and off. To get it off you'll want to press on one of the three plastic tabs you'll see underneath the bezel. Crystal diameter 53.2 mm or the 53.8 mm diameter crystal will need to be inserted with a crystal press. Either size will fit, but the 53.8 mm diameter crystal will give a higher dome.
  • For indicator series 80 (the miniature dial indicator) the bezel can be pried off with a screw driver; If the wire retaining ring becomes distorted in the process, bend it back into shape. You'll need a press to install the new crystal. See parts list.
  • Series 81 uses the 40.0 mm diameter crystal
  • Series 641 uses the 40.0 mm diameter crystal
  • Series 655 uses crystal #840
  • Series 656 uses PT06908 (not available from us)
  • Series 689 uses the 40.0 mm diameter crystal
  • Back-plunger model 196 uses the 36.6 mm diameter crystal. Replacement is similar to the Last Word test indicator (see above).
  • Starrett 25-631 uses crystal diameter 53.2 mm (crystal press required)

The oldest Starrett dial indicators, probably 1950's and earlier, had three screws on the side of the bezel. Remove these and don't lose them! The bezel lifts off but you will need a crystal press to insert the new crystal. When reassembling, make sure the small slots in the dial and the underlying spring, line up with the small tab inside the bezel.

  • Starrett 25-F1" uses crystal diameter 53.2 mm (crystal press required)

Teclock dial indicator: the blue bezel of Model AI-921N rides on an o-ring and it can be pried off. The flat 53.8 mm diameter crystal needs to be installed with a crystal press. It may be hard to get the bezel to snap back onto the o-ring. Press down firmly and squarely with the palm of your hand. Newer versions of these indicators use he 54.6 mm diameter crystal. Some older versions had a small clamp which you can only see once you remove the back cover. You will have to loosen the screw just enough so that the clamp slides inwards, releasing the bezel. A small wire spring anchors the other side of the bezel. You may lose this spring if you are not cautious. If you need a new crystal for the Teclock indicator, send us the entire gage along with a check for $40 and we'll install the appropriate crystal for you (shipping included). That way you'll know you're getting the correct size. Otherwise, we make no guarantees that what you buy will fit.


GIROD-TAST
The "other" Swiss indicator still made in Switzerland.

Long Island Indicator Service
Long Island Indicator Service was founded in 1960. We provide professional repair service for precision measuring tools and gages with an emphasis on Swiss made test indicators, dial indicators, dial calipers and micrometers. We are pleased to be a recognized service partner for Brown & Sharpe.

Contact Us
Our Sales Terms
How to send repairs

Disclosure: Although most of the links on this website allow you to make a purchase directly from us, some links may direct you to Amazon. Any purchases you make from those links will result in a commission for us. That commission helps to pay for the construction and upkeep of this web site. We are grateful for any purchases you make through those links.

Privacy: We do not collect any information while you are visiting this website unless you proceed to place an order. If you place an order, your information will be kept confidential and will not be sold or made available to any other entity. If one of our links leads to Amazon, their privacy statement should be considered.

© 2024 Long Island Indicator Service Contact Us